TQ Assessment Gathering in BT2
Below are instructions on performing the TQ assessment with BT2. For more information on the TQ assessment, please see the BT2 online manual.
Preparing to record the TQ Assessment
Configure Settings
- Connect your amplifier and make sure it is on.
- Open the BT2 software and select the TQ protocol category.
- Select the TQ protocol to start the session.
- Add a new client or select a client from the drop-down list.
Any directories you have created for clients in the default folder will appear here. - Click OK.
- Select your amplifier by clicking the “Source” button. Choose your amplifier from the menu.


Apply Electrodes
Place cap and insert saline-saturated electrodes. Or place electrodes as normal if not using a cap.
Placing Ground and Reference Electrodes
- The ground/neutral on the TC26 Trainer’s Cap is at AFz and must ALWAYS be used with saline solution. For electrodes with paste, the ground can be any site that is not needed as active or reference.
- A1 and A2 are used as linked references for all steps, placed behind the ears (or on ear lobes with clips).
Placing Active Electrodes
The electrode for the first active site listed goes into the 1st channel port, the second active into the 2nd port, etc. When gathering from homologous sites (e.g. T3 and T4), electrodes from left hemisphere should go in first (CH1), right hemisphere in second (CH2). When gathering on the midline (e.g. Fz and Pz), the furthest forward electrode should go in first (CH1).
Connect the electrode wires to the amplifier for step 1
(T3 T4 C3 C4).
- Ground: AFz to gnd
- References: A1 to 1-; A2 to 2-
- Actives: T3 to A/1+; T4 to B/2+; C3 to C/3+; C4 to D/4+
 Amplifier Electrode Hookup
Check the signal quality and correct any issues.


Open the Signal Tester window by clicking the brain wave icon.
This tester window may remain open if you choose.
- In the Oscilloscope at the top, very regular, mechanical and fast waves suggest artifact. Very large waves or rolling/wandering baseline for a channel also suggest problems. Channels should show about the same amount of activity. A very attenuated signal in one or more channels indicates a poor connection.
- In the Power Spectrum windows below, look for spikes at 50 Hz or 60 Hz depending on your electrical system. If these are dominating the spectrum, there may be electromagnetic interference
- or you may have a poor connection between the skin and electrode.
- If all channels show spikes and you are using a laptop, try unplugging the power transformer from the wall and the computer to run on battery. See if the spikes drop or disappear.
- If there are signal problems, re-prep electrodes and verify that the signal has improved.
When the signal is good, continue.
Record data (using TC26 or electrodes)
Client Instruction
Explain the process to the client.
- First minute of recording will be relaxed, still, with eyes closed
- Second minute of recording will be relaxed, eyes open and still
- Third minute of recording will be relaxed performance of a task* with eyes open. Explain that this is not a test of the client’s performance but a way of seeing how the brain responds to the challenge.
Before recording each area, explain the task and verify the client understands what to do. Verify that the client is relaxed, sitting straight with both feet on the floor with eyes closed or open as appropriate.
Step 1
- Instruct the client for the eyes closed (EC) step.
- Press “Play.” The program will count down 5 seconds and then start. It will gather data until enough data are collected
- The program will pause and a dialogue window will open. If it says the amount of data is enough to process the recording, click the button “Proceed to the next recording.”
- Instruct the client for the eyes open (EO) step: Open eyes and look straight ahead.
- Press “Play.”
- The program will pause and a dialogue window will open. If it says the amount of data is enough to process the recording, click the button “Proceed to the next recording.”
- Instruct the client for the task (TSK) step. Client listens for detail.
- Press “Play.”
- The program will pause and a dialogue window will open. If it says the amount of data is enough to process the recording, click the button “Proceed to the next recording.”
Step 2
Move active electrodes to next sites
(F3 F4 P3 P4)
Check the signal quality and correct any issues.
- Instruct the client for the eyes closed (EC) step.
- Press “Play.”
- The program will pause and a dialogue window will open. If it says the amount of data is enough to process the recording, click the button “Proceed to the next recording.”
- Instruct the client for the eyes open (EO) step: Open eyes and look straight ahead.
- Press “Play.”
- The program will pause and a dialogue window will open. If it says the amount of data is enough to process the recording, click the button “Proceed to the next recording.”
- Instruct the client for the task (TSK) step. Digit-span working memory test.
- Press “Play.”
- The program will pause and a dialogue window will open. If it says the amount of data is enough to process the recording, click the button “Proceed to the next recording.”
Thresholds – Thresholds are calculated using steps 1 and 2 with eyes closed and eyes open. It is possible that an acceptable recordings (green) may be determined to be unacceptable (red) and need to be re-recorded at the end of step 2 EO once the threshold calculation is completed.
Step 3
Move active electrodes to next sites
(Fz Pz Cz Oz)
Check the signal quality and correct any issues.
- Instruct the client for the eyes closed (EC) step.
- Press “Play.”
- The program will pause and a dialogue window will open. If it says the amount of data is enough to process the recording, click the button “Proceed to the next recording.”
- Instruct the client for the eyes open (EO) step: Open eyes and look straight ahead.
- Press “Play.”
- The program will pause and a dialogue window will open. If it says the amount of data is enough to process the recording, click the button “Proceed to the next recording.”
- Instruct the client for the task (TSK) step. Visualization.
- Press “Play.”
- The program will pause and a dialogue window will open. If it says the amount of data is enough to process the recording, click the button “Proceed to the next recording.”
Step 4
Move active electrodes to next sites
(F7 F8 T5 T6)
Check the signal quality and correct any issues.
- Instruct the client for the eyes closed (EC) step.
- Press “Play.”
- The program will pause and a dialogue window will open. If it says the amount of data is enough to process the recording, click the button “Proceed to the next recording.”
- Instruct the client for the eyes open (EO) step: Open eyes and look straight ahead.
- Press “Play.”
- The program will pause and a dialogue window will open. If it says the amount of data is enough to process the recording, click the button “Proceed to the next recording.”
- Instruct the client for the task (TSK) step. Silent reading.
- Press “Play.”
- The program will pause and a dialogue window will open. If it says the amount of data is enough to process the recording, click the button “Proceed to the next recording.”
Step 5
Move active electrodes to next sites
(Fp1 Fp2 O1 O2)
Check the signal quality and correct any issues.
- Instruct the client for the eyes closed (EC) step.
- Press “Play.”
- The program will pause and a dialogue window will open. If it says the amount of data is enough to process the recording, click the button “Proceed to the next recording.”
- Instruct the client for the eyes open (EO) step: Open eyes and look straight ahead.
- Press “Play.”
- The program will pause and a dialogue window will open. If it says the amount of data is enough to process the recording, click the button “Proceed to the next recording.”
- Instruct the client for the task (TSK) step. Pattern recognition.
- Press “Play.”
- The program will pause and a dialogue window will open. If it says the amount of data is enough to process the recording, click the button “Proceed to the next recording.”
- Then stop once all the steps are completed.
Do-It-Yourself Tasks
For those unable to find someone to help performing an assessment on themselves, you can make your own recordings for listening tasks. We have some materials for this purpose
More about recording TQ Assessment
Each step has color indicators for the data gathering.
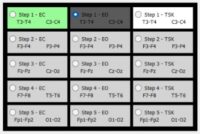
- Grey = no recording at that step
- Dark grey = the active step
- Green = there is a recording that contains more than 30 seconds of valid data
- Red = there is a recording that is completed but it contains too much artifact
- White = there is a recording but it is not complete (<60 seconds)
To start with a new client after recording for another client, click the “Record” button. You may need to press it a second time.
To start again with the same client after recording for him/her, click “Delete selected recording.”
delete button


×
Amplifier Electrode Hookup
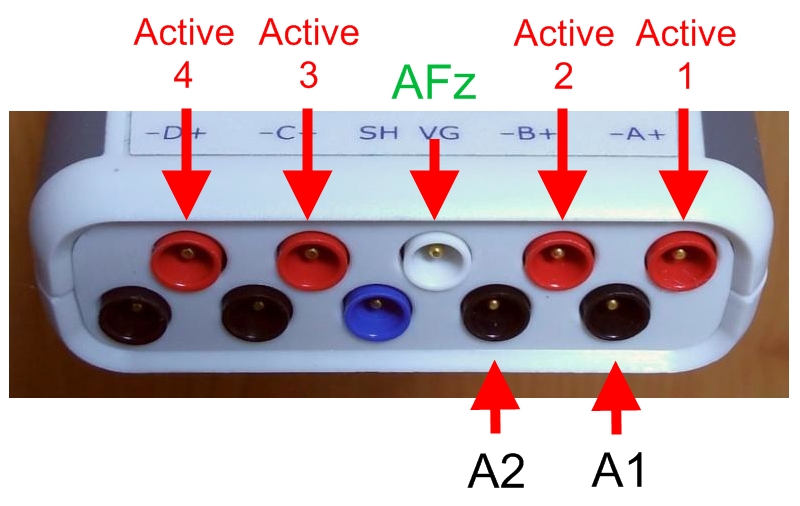
Connect the electrode wires to the Optima for Step 1
(T3 T4 C3 C4)
- Ground: AFz to VG
- References: A1 to A-; A2 to B-
- Actives: T3 to A+; T4 to B+; C3 to C+; C4 to D+
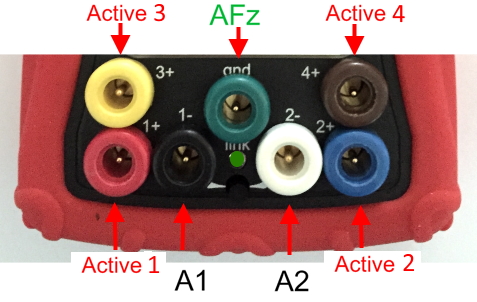
Connect the electrode wires to the Wiz for step 1
(T3 T4 C3 C4)
- Ground: AFz to gnd
- References: A1 to 1-; A2 to 2-
- Actives: T3 to 1+; T4 to 2+; C3 to 3+; C4 to 4+