Brain-Trainer for BioEra Manual
Current version: 1.1.5 See changelog
Legacy Software: Brain-Trainer for BioEra is no longer available.
BioExplorer was a revolutionary piece of brain-training software at around 2000. Larry Janow, its programmer, stayed involved with it for several years. Brain-Trainer developed a set of training protocols and expanded them over several years. We took over most of the tech support functions as Larry lost interest, and we made several attempts to re-activate his interest in producing a version 2 of the software, but, despite numerous promises of an update, he never produced anything further. We finally realized that the software was not going to go forward.
BioEra was a platform designed to compete with BioExplorer but without a user interface. After we realized that BioExplorer has a dead end, we had our own programmer produce an updated version of brain-training software on the BioEra platform. Many of the functions we had been requesting on BioExplorer were placed on Brain-Trainer for Bio Era, but the interface was very limited and again we had a programmer who had little interest in updating. Finally we decided to develop Brain-Trainer 2 from the ground up, with a first rate user interface and an extended range of protocols that included much better feedback options and training protocols that were not available on either of the other two platforms. More importantly, BT2 was dramatically easier to learn, use and adjust. We also shifted to a subscription payment model so home users are able to have the full use of the program’s features for very low cost.
We stopped selling BioExplorer several years ago as it became increasingly difficult to buy or get service for it and we no longer had the ability to update to protocols. When BT2 was released, we stopped selling BT4BE. It has not been updated in the past couple years, partly because a number of important changes cannot be made due to unwillingness of the BioEra programmer to update his code. And it is very clumsy to use. We now focus sales on BT2 for ease of use, linkage with the TQ8 assessment/training planning and its cost. All of our constant updating efforts are focused on BT2. The $50/month subscription assures that users get our best software, constantly being upgraded at our best price. If you plan to work professionally, you can pay $1,200 for 3 years, which gives you BT2 at $33.33/month. The TQ8 assessment and training planning software, which provides completely customized training for every client costs $40/month.
Introduction
Brain-Trainer for BioEra is a complete neurofeedback system that includes the powerful assessment of TQ and some of the most versatile and user-friendly training designs in the world. The whole structure of the program is made “by trainers for trainers”. With the Brain-Trainer software, you can use many different types of feedback: video files, games, MIDI music, brightness and much more.
Disclaimer: The Brain-Trainer software is intended for psychological training education and scientific research and should not be used as a medical technology.

Download and Install Brain-Trainer software
The first step toward using your Brain-Trainer software is the software installation. This means you must have one or more software setup installer files on your computer that you will run. In order to run the setup file it must be saved on your computer.
The main setup file is the minimum required to run Brain-Trainer for BioEra software, but you may also have purchased additional modules for HEG/LIFE 2.0, Shadow or Games. If your purchase includes the full installation with all modules, you will have 4 setup installers in total. When additional modules are purchased, they may not be visible in your list of downloadable files immediately. When your order is processed the installers will be added to your downloads and you can then download them.
Download
Save downloads to your computer. The obvious location is your computer’s Downloads folder. You can then open the Downloads folder to find any files you have downloaded.
Once a file is saved to your computer and extracted if needed, it is ready to be run.
Install
You may wait for your hardware to arrive before installing software.(PREVIOUS USERS: Before installing your software, check whether there is already a version on your computer. If have installed version 1.011 or older, please uninstall that version before proceeding.)
Double-click each file to run the setup installer. If prompted “A newer version of the K-Lite Codec Pack is available! Do you want to download the latest version?” click “No.” Exit the Codec Guide page if it opens in a browser. You will not need it.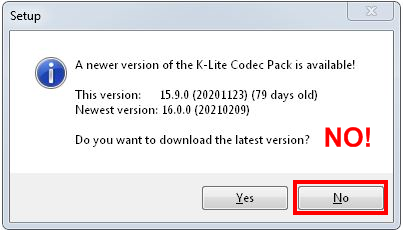
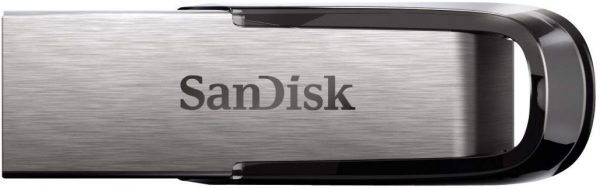
Connect your SanDisk USB software dongle key to a USB port on your computer. This dongle must be plugged in when you want to use the software. Brain-Trainer software will not run without the USB dongle key.
Signatures
If you have purchased additional modules, they will require additional files to be placed on your USB dongle key to unlock the components of the software. These will be sent to you by email.
Open your software
Double-click the Brain-Trainer for BioEra shortcut found on your desktop to open your software.
Check for new updates and update your software to the current version. (See next section.)
Update
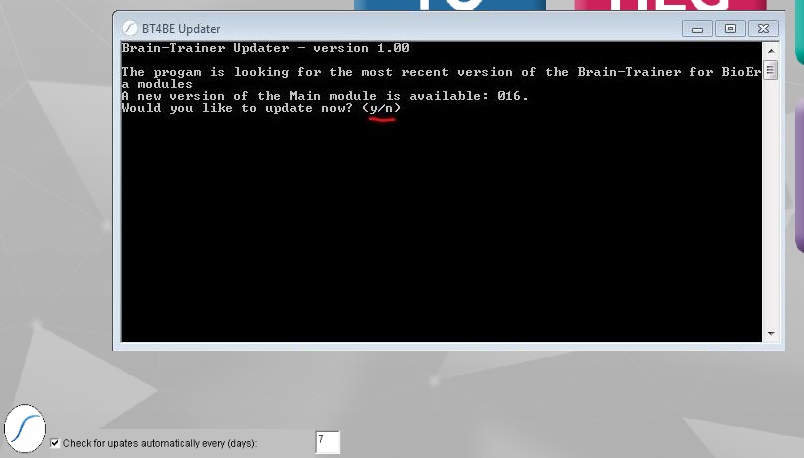
To check for updates manually, click the Brain-Trainer icon at the bottom left to open the Updater.
Brain-Trainer for BioEra software (v1.1) offers the option to select automatic updates and to designate how often it will check for updates. The recommended period is every 7 days. We recommend you not skip updates. If you do not want automatic update checks, uncheck the box “Check for updates automatically every (days):”

How to update Brain-Trainer software
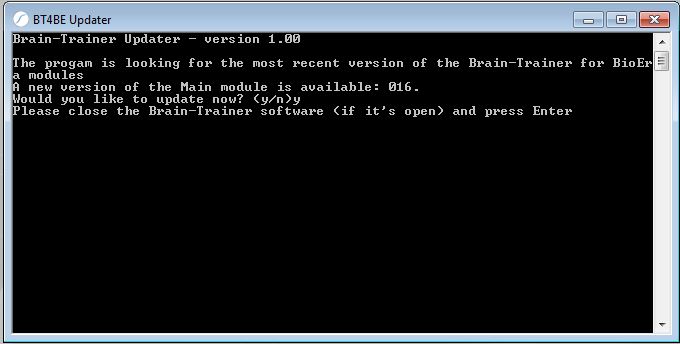
The Updater will show a message prompting you to close the main program. When you see this message, close BioEra (the colored window containing the design names — TQ, HEG, FRE, etc.) but don’t close the dark screen (BT4BE Updater). Press Enter.The program will go through the download/installation process and will let you know when it is finished.
Device Connection
- Connect your device to the computer.
- Open Brain-Trainer for BioEra.
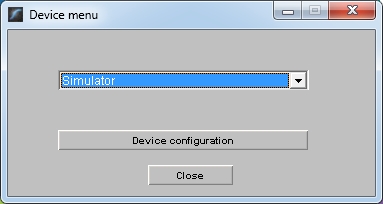
- Click on the Source to open the Device menu.
- Select your J&J device from the dropdown menu. Select GP-8 (2 channels) or GP-12 (and C2+, 4 channels).
Device Configuration will default to 2C EEG for the GP-8e. This can be used for EEG training of 1 or 2 channels. Linked references require a jumper wire that connects to the amplifier ports.If you have the GP-12e or C2+, this selection should be 4C EEG linked. This can be used for most EEG training of 1 or more channels. Other configurations are available for independent references. If you do not see these configurations please contact us for an update. - Close the Device Menu.
If the Source is not green, select Reload design (green square at top left).
- With the software open, plug the Neurobit device in the USB port and turn the device on.
- Click on the Source to open the Device menu. Tip: Click to expand the drop menu.
- Make a selection in the dropdown menu.
-
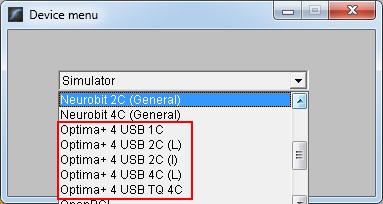
Neurobit Optima+ 4 USB
Select one of the Optima+ 4 USB settings. You may start with 4C (L) if you do not know what to choose. Then click Close in the Device menu window. Device setup is finished!
Return to this Device menu to select the appropriate settings for your training. 1-channel training uses “Optima+ 4 USB 1C,” for example. Refer to your training plan to know how many channels and whether references should be linked or independent. “Optima+ 4 USB TQ 4C” is for TQ assessment gathering with TC26, electrodes or Electro-Cap.
-
Neurobit 2- or 4-channel devices
Select either 2C or 4C (General) depending on how many channels your device has.
(Neurobit 4C (General) also works with Optima+ 4 USB using the following instructions. You may choose this if you want to edit the settings rather than use default.)- Click Device configuration
- Select your Neurobit device in the first dropdown list. In this example, the device is “Neurobit 2C (General)”, but yours might be another one.
- Click Apply.
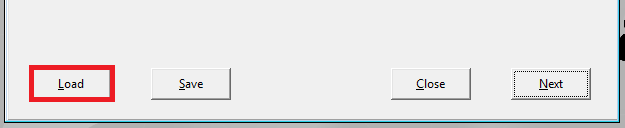
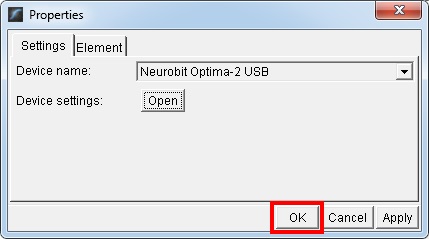
- Click on the Device settings: “Open” button.
In the new window, load your settings.
- Click “Load.”
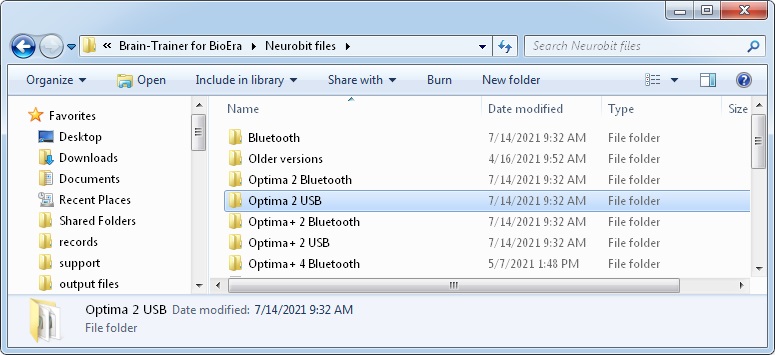
- If you are not already there, navigate to the folder C:\Brain-Trainer for BioEra\Neurobit Files\[Optima 2 USB in this example]. Users with a device other than Optima+ 4 USB will have a set of settings in their own folder.
Select a file to start out with. If you are not sure of which file to choose, then select “EEG 2C (L) Linked” to try out your new software. When training EEG, return to these device settings to select settings appropriate to your protocol. 1-channel training uses “EEG 1C,” for example. Refer to your training plan to know how many channels and whether references should be linked or independent.HEG settings are automatically loaded when the HEG design is opened, so no settings selection is necessary for HEG.TC26 Trainer’s Cap uses regular EEG settings as for electrodes. “Electro-Cap” training settings are available only for use with Optima+ 4 USB with an electrode cap with ribbon cable using the “Neurobit 4C (General)” device.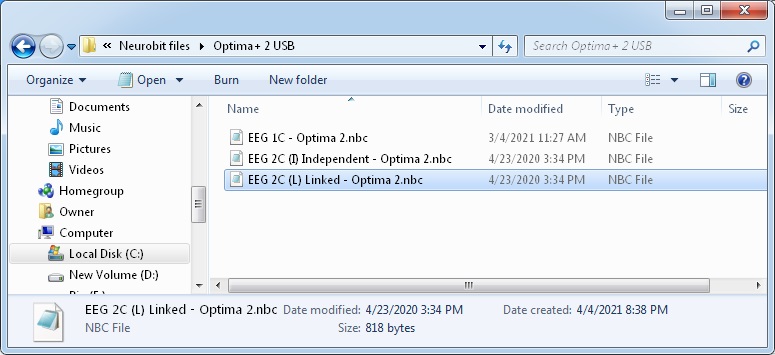
- Click Open once you have selected your settings file.
- Click Close on the Settings window.

- Click OK and close the Device menu.
-
The device name will switch to Neurobit. A green light means the program is receiving a signal from the device. If it is not green, be sure your device is turned on.


The Pocket Neurobics driver must be installed before connecting to the software. If you have not already done so, download the PN Wiz Driver. (This would have been installed running the wiz amplifier setup.) Save and then right-click to run as administrator. Then continue with connecting to the software.
- Plug the PN Wiz device in the USB port.
- Click on the Source to open the Device menu.
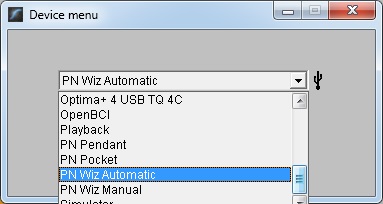
- Select “PN Wiz Automatic” in the dropdown menu. Tip: Click to expand the dropdown menu.
The device name will switch to PN Wiz with a green light. That means the program is receiving a signal from the device. There is no need to select a COM port.
If the source light does not turn green, Select PN Wiz Manual instead of Automatic. Then click the USB symbol. Under COM port: select the correct COM port for your device. Find which port to use
Device configuration should default to Mode 4ch EEG, Radio channel: USB only, Power: on, Link EEG References: On. Generally these do not need to be changed. 2 settings you may want to change are 1) TLC 4C Assess to select TQ Assessment steps and 2) EEG Cap Setup chart: Show/Hide to select electrode cap sites.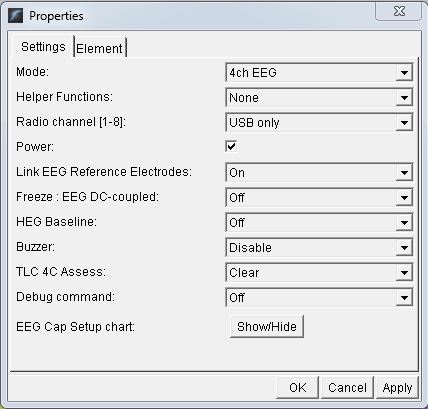
Close Device menu when finished.
NOTICE: Do not attach the Alpha200 amplifier to your computer until AFTER you have completed the software installation process.
- Download the file AlphaAmp_W7_64.exe
- Run the installer.
- Now you may connect the Alpha200 to your computer.
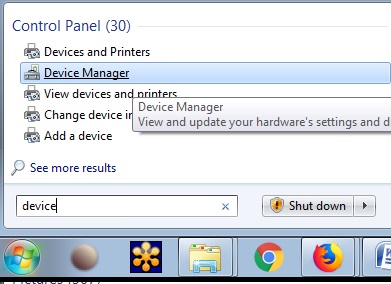
- Open the computer’s Device Manager (In the search field type “Device Manager” and select it).
- Click arrow to expand Universal Serial Bus controllers to locate the unknown USB.
- Right-click and select Update.
- For a second time, right-click and select Update.
- Open Brain-Trainer for BioEra.
- Click on the Source to open the Device menu.
- Select Alpha200 in the dropdown menu.
- The device name will switch to Alpha200.
- Connect the Bluetooth in a USB port and turn on the Ganglion power.
- Click on the Source to open the Device menu.
- Select Ganglion in the dropdown menu.
- Click Source again.
- Click Device configuration.
- In the drop menu, select the serial port in which your Ganglion device is connected. In this example it’s COM3, but yours might be another one. Be careful with this selection as choosing the wrong port may make the program freeze.
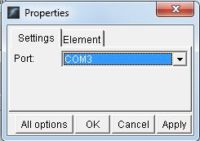
If you do not know the COM port number assigned to your device when installing it, you can find it in the computer’s Device Manager:
Open the computer’s Device Manager (In the search field type “Device Manager” and select it).
Click arrow to expand Ports (COM & LPT) to see which port the Bluetooth is using. - Click Apply.
- Click the Ganglion settings to confirm that Mode is set to EEG, EMG or ECG.
- Click OK and close the Device menu.
The device name will switch to Ganglion and the light should be green. If it is not, be sure you have your device powered on.
Software Features
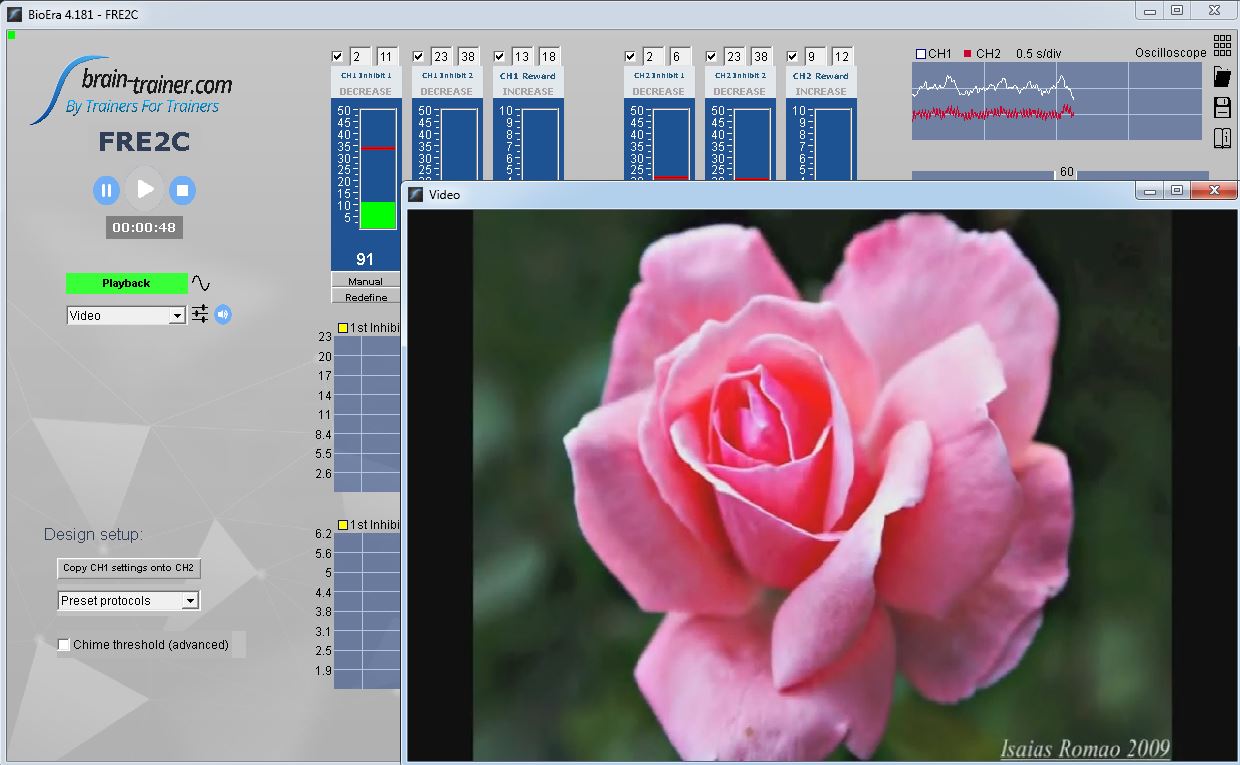
This is the main screen of the Brain-Trainer software:
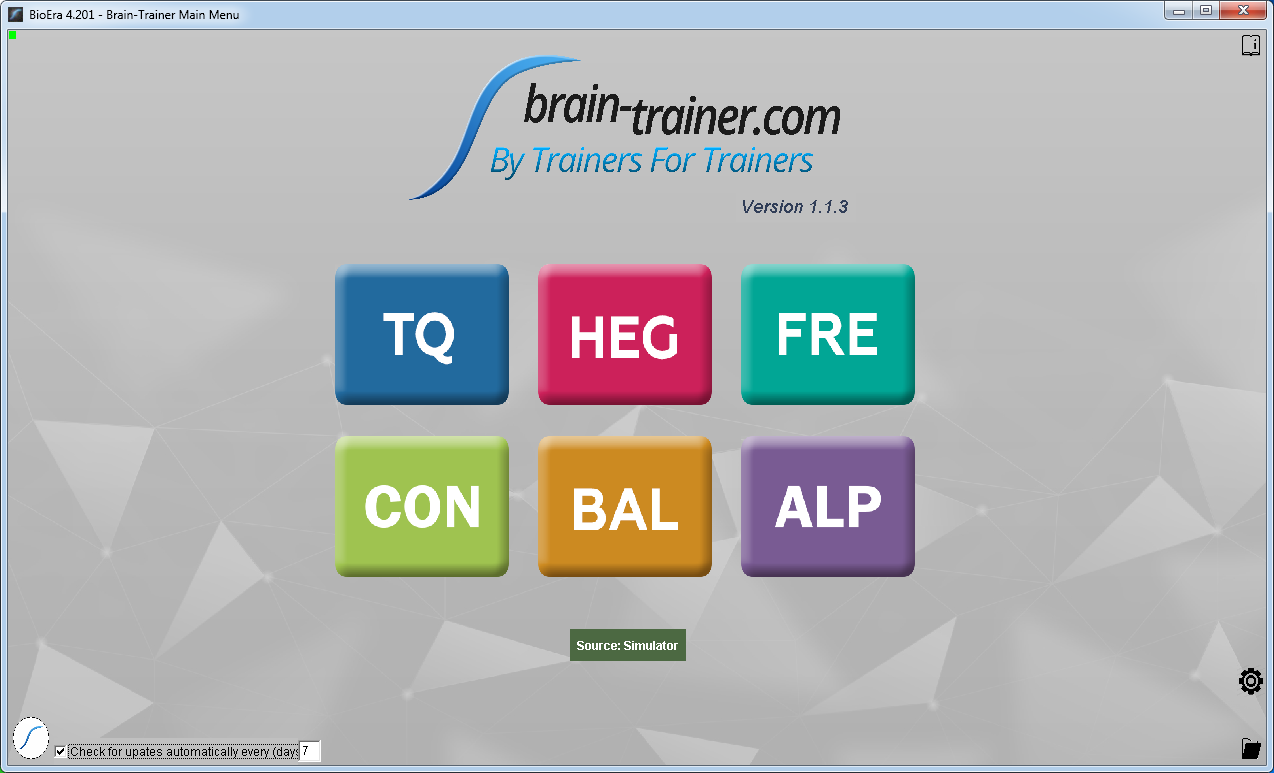
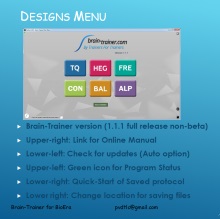
The colorful buttons in the center are buttons to select protocols – “designs” – for training or assessment. Clicking any of them will open a sub-menu from which to choose the type of training you want to do. The protocols are categorized into the following types:
- TQ – Trainer’s Q assessment
- HEG – Hemoencephalography blood perfusion training
- FRE – Frequency band training
- CON – Connectivity training
- BAL – Balance training
- ALP – Alpha training

More information on protocols is found in the Design Options section.
Status checker (top left) indicates whether the program is turned on or off. When it is green, the program is receiving a signal from the device.
When red, the program is stopped. Click to select an action.
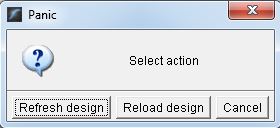
“Refresh design” refreshes all the elements in the screen and gets the design back to the working mode. It can be used anytime you make a change that is not automatically detected by the system.
“Reload design” closes and reopens the design. It can be useful if you have a frozen screen and the refresh does not solve the issue. It should be used also after making changes in the device setup if the device does not connect (green Source color).

This “information” icon links to this online instruction manual.
Click to open.

The update checker checks for new updates and prompts the user to update now.
You can set automatic updates as often as you prefer.

The “Source” colored box in the bottom center indicates which device is currently being used, as well as its status. A green light means the system is receiving data from the device. A red light means there’s no data being sent from the device and may indicate an issue with the device connection and/or setup.
This also opens the Device menu. Here you can set up your devices and select device settings. If it is the first time you run the Brain-Trainer software, the device is set to “Simulator”.

Session saving configuration allows the user to choose an alternative location to save client files rather than the default “session” folder.
This is done from the Main Screen.

Protocol loader allows you to load a pre-saved protocol for a specific client.
See Saving protocols and Loading saved protocols.
Designs have additional icons.

Designs menu allows you to select a protocol for training.
This appears the same as on the Main menu of the program.

Protocol saver allows you to save a pre-configured protocol for a specific client and even create all protocols for the entire Whole-Brain Training Plan to send as a folder for a client. See Saving protocols and Loading saved protocols.

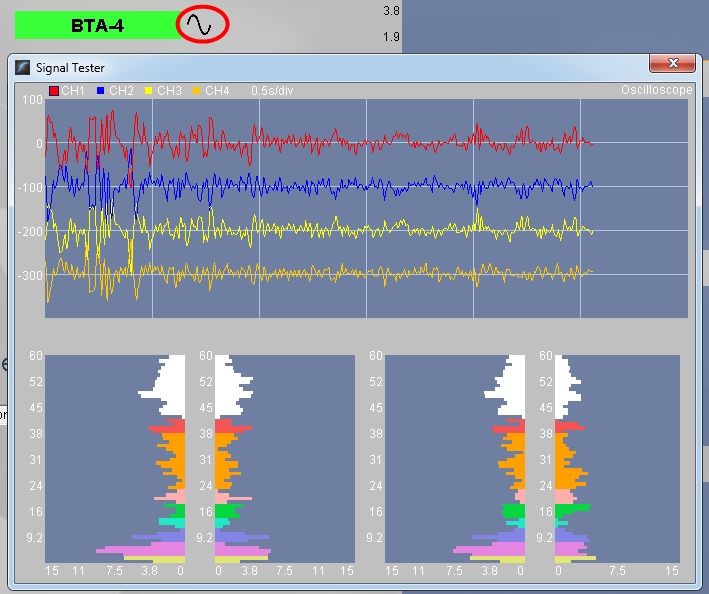
Signal tester shows the raw EEG and histogram to check for signal quality.
Click and drag corner to resize window.

Feedback manager opens window to customize feedback settings.
(playlist, volume, brightness, etc.)

Sound configuration opens settings for changing feedback sounds.
Select MIDI sounds or click sound.

Midi sound control turns MIDI feedback tones off or on.
Click to turn off or back on.
Design Options
TQ – TQ Trainer’s Q assessment

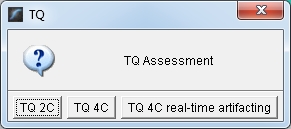
TQ 4C real-time artifacting
HEG – Hemoencephalography

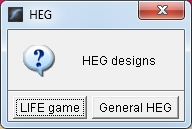
LIFE Game for HEG
General HEG:
FRE – Frequency

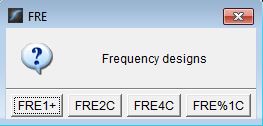
FRE1+
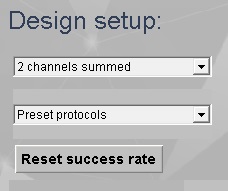
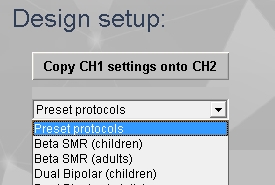
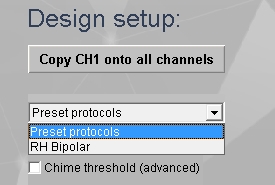
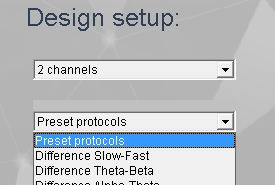
Select from 1 channel, 2 channels summed and 4 channels summed. Signals are added together before going forward to filters leaving a single target for all sites in each training band. For your convenience, a button is available for pre-set protocols Centering (2-channel summed), Trauma Release (1C) and Windowed squash (4C) under Design setup.
“Reset success rate” button will reset threshold targets after using Trauma protocols.
FRE2C
FRE4C
FRE%1C
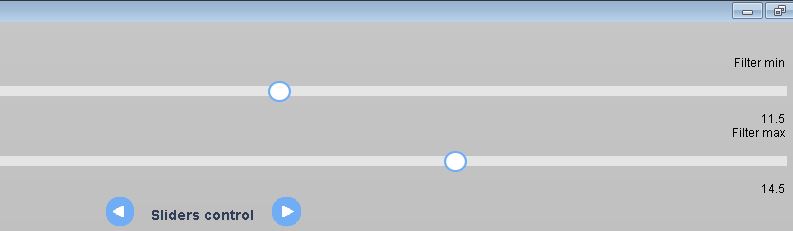
Sliders will keep the last values that were used the next time the design is opened. Use reset buttons to set sliders to commonly used bands (12-15 Hz, 9-12 Hz).High Beta inhibit is generally left on.

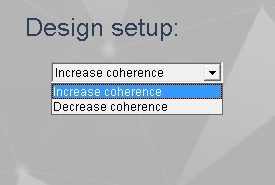
CON – Connectivity


Multiband Coherence 2C or 4C
Sync 2C and 4C

Multivariate Coherence (MVC)
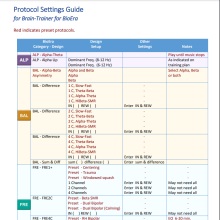
BAL – Balance

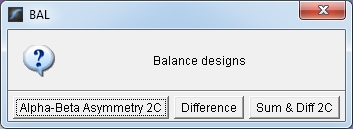
Alpha-Beta Asymmetry

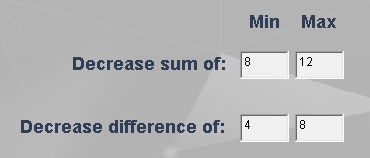
Difference
Sum & Diff
ALP – Alpha

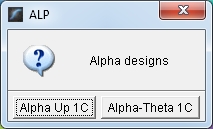
Alpha Up
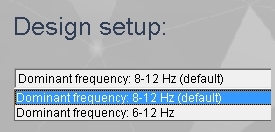
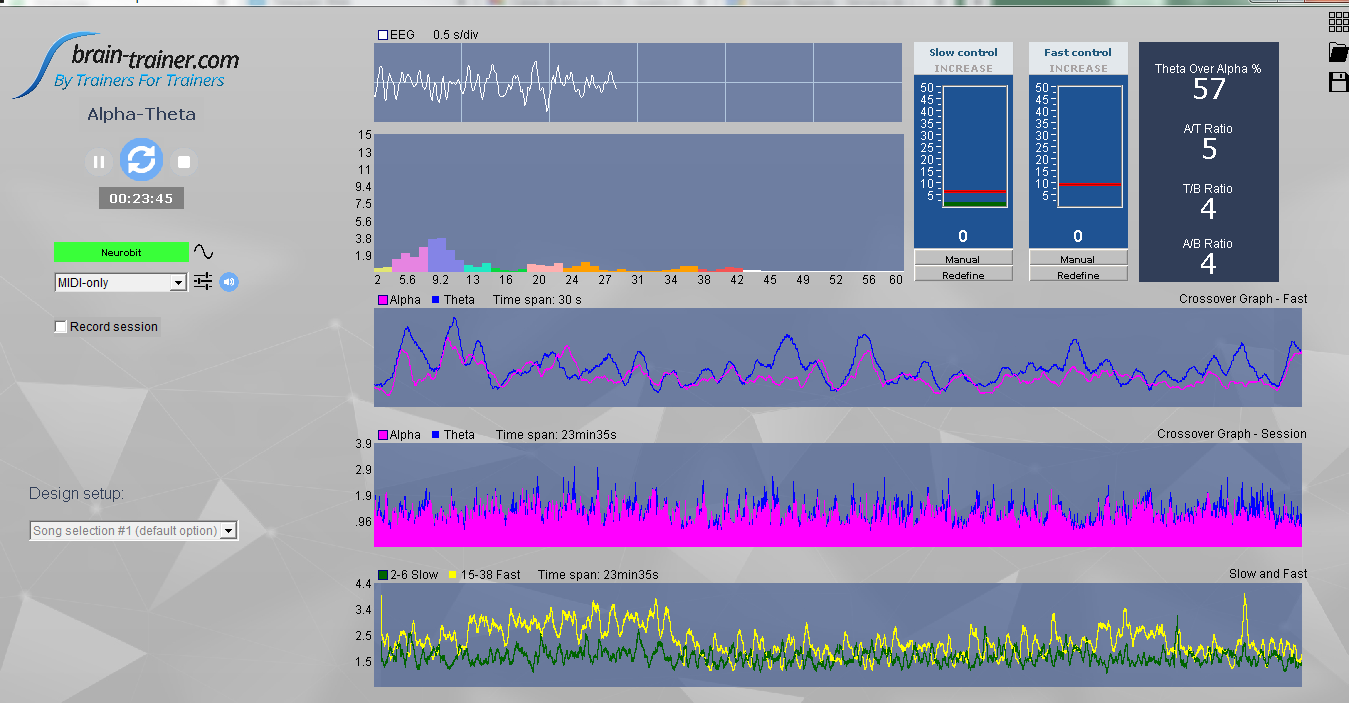
Alpha-Theta
Design Features
Session controls
Pause, Play and Stop buttons are at the top left of the designs for starting and stopping a session. Notice that the active (available) button- Play – is blue before the session is started. While a session is playing, the active buttons – Pause or Stop – are blue.
After a session is stopped, the Play button will become a “Restart” button. Restart must be pressed before making any further selections, including opening a new design.


Session Timer

Device Settings

Session Playback
Click the device and from the drop menu select “Playback.”
Signal Tester
The Signal Tester allows the trainer to check for signal quality before starting the session. This window has raw EEG signal and spectral displays just as in each design, though the signal can be assessed more easily due to the larger size of the instruments. The signal tester shows the actual signal that is sent by the amplifier. Then the signal is filtered (50 Hz lowpass) before going into the design objects, so 50/60 Hz interference is not shown in the training displays.
Open the Signal Tester window by clicking the wave icon. The Signal Tester window can be sized larger by clicking and dragging the corner of the window. This can be opened at any time before or while the session is playing.
EEG Oscilloscope
This displays the raw EEG. Signal quality can be checked and the EEG can be visualized and assessed.
Power Spectrum
This spectral display shows the amplitudes for all frequencies. The frequency bands are divided by color. In the order that they appear, they are as follows:
2-4 (delta) – yellow
4-8 (theta) – pink
8-12 (alpha) – purple
12-15 (low beta / SMR) – aqua
15-19 (beta 2) – green
19-23 (beta 3) – pink
23-38 (high beta) – orange
38-42 (gamma) – red
42-60 (not used in training) – white
Feedback selection
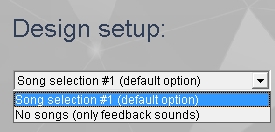
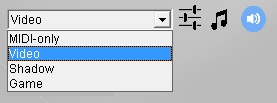
MIDI music is set as the default feedback. Other available feedback options are shown depending on the design and which modules are installed.

The feedback manager is a control panel from which settings are selected for the feedback that is chosen.
MIDI tones and Click sound
Default audio feedback “Sound configuration” allows a user to change the properties of MIDI and click sounds used for feedback in most protocols.
MIDI sound configuration is for advanced users only.
MIDI sounds can be muted if desired by clicking the blue speaker icon.
Click to mute and unmute.
Record Session
To record a session (assessment or training), click the box “Record session.” This will show the option to select or add a client. The file name can be customized by adding a complement to the filename if desired.
The default folder is AAA_Sample Client for your testing. This sample client folder is located in the folder C:\Brain-Trainer for BioEra\session. Other client folders you create will be here unless you designate an alternate location.

Client folder

Design settings
Saving protocols

Loading saved protocols
Thresholds (targets)
Thresholds are target levels that are set for training. If the box is ticked, the threshold will become visible and active. Feedback is usually given when the target is met (training signal is either above or below the threshold bar). Most designs set thresholds automatically or switch to manual after baseline gathering period (e.g. 30 seconds).
The top number indicates the running average of the signal value (e.g. amplitude). The lower number indicates the percent of the last 30 seconds the target is being met (“percent success”)
Threshold properties can be changed but should be done so by advanced users only..

Feedback Options
Training can be done with just the default MIDI (sound) tones and click sound or you can select enhanced feedback from our available options.
Click – contingent audio feedback
MIDI – continuous audio feedback
Video player feedback
NOTE: Make changes to the video playlist before starting the data stream.
- Open the Video panel..
- Load videos to playlist and select settings options.
- Close video panel.
- Start session. (Play).
Shadow feedback
NOTE: Start the data stream before starting the shadow.
- Select design settings
- Select shadow settings
- Open the Shadow
- Start the session
- Activate the shadow

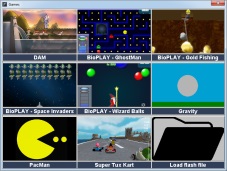
Games Feedback
Games feedback is an add-on option for feedback. The games panel has a selection of 8 games plus the option to load your own flash game that is compatible with Brain-Trainer, such as other BioPLAY games, that are not included with Brain-Trainer software. Required inputs for such games are:
- Input 1: On/Off (boolean); on when all targets are met simultaneously
- Input 2: On/Off (boolean); on when all targets are met and sustained for over 1 second.
- Input 3: Variable (percentage); value based on ratio of all thresholds combined (how close or distant the current value is from the target value)
HEG options and Shadow feedback
Running BioEra Pro
A full version of BioEra Pro is installed with your Brain-Trainer software. Most trainers will use only the Brain-Trainer interface and designs. For advanced trainers with knowledge of programming designs themselves, BioEra Pro can be run on its own. To run BioEra Pro, open C:\Brain-Trainer for BioEra. Find the file bioera.exe (application) and double-click. Bioera.exe gives access to the full function of BioEra. You may see a window asking for a password. Click cancel. Then a message is shown that it is in “run-only” mode. This only refers to the specific design. It is possible to create a new design or load a design from the computer.
Troubleshooting
Please see our troubleshooting page for Brain-Trainer for BioEra software.
![]() This manual is under construction. If you have any issues, send an e-mail to bt4be
This manual is under construction. If you have any issues, send an e-mail to bt4be
Copyright © 2021, Brain-Trainer International, Inc.